The best Chocolate Peanut Butter Fudge
Rich and creamy chocolate peanut butter fudge made with chocolate chips, peanut butter, and sweetened condensed milk. This easy no-bake dessert is perfect for holidays and parties
📋 Table of Contents
Why You’ll Love This Recipe
This chocolate peanut butter fudge is the kind of no-bake candy I like to make when I want clean layers, a rich bite, and very little fuss at the stove. The chocolate layer is smooth and deep from semi-sweet chips, while the peanut butter center is creamy, nutty, and just salty enough to keep the sweetness in check. When chilled properly, each square cuts with firm edges but melts slowly on the tongue, leaving that classic chocolate-peanut butter finish.
The sweetened condensed milk is what makes this fudge reliable. In traditional fudge, sugar temperature can decide whether the texture turns creamy or grainy. Here, condensed milk adds sweetness, dairy richness, and body, helping the melted chocolate and peanut butter set into a sliceable texture without needing a candy thermometer. The low heat matters, though. If the chocolate is heated too aggressively, it can turn thick, dull, or slightly gritty. I have rushed this step before, and the fix is to remove the pan from the heat early and let gentle residual warmth finish the melting while you stir.
The layered method also gives this fudge its appeal. Chilling the first chocolate layer for about 10 minutes helps it firm just enough to hold the peanut butter layer without mixing into it. If that base is still warm and soft, the layers blur together and the finished pieces look muddy instead of distinct. If it gets too hard, the layers may separate when sliced. The sweet spot is a surface that feels set but still slightly tacky.
Roasted peanuts are optional, but they add a welcome crunch against the creamy fudge. I prefer them on top rather than mixed throughout because they stay crisp and give a toasty aroma the moment the pan is uncovered. A small pinch of salt also improves the flavor more than it seems; it sharpens the cocoa, rounds out the peanut butter, and stops the fudge from tasting flat. Serve it cold for a firm candy texture or let it sit out for 5 minutes for a softer, creamier bite.
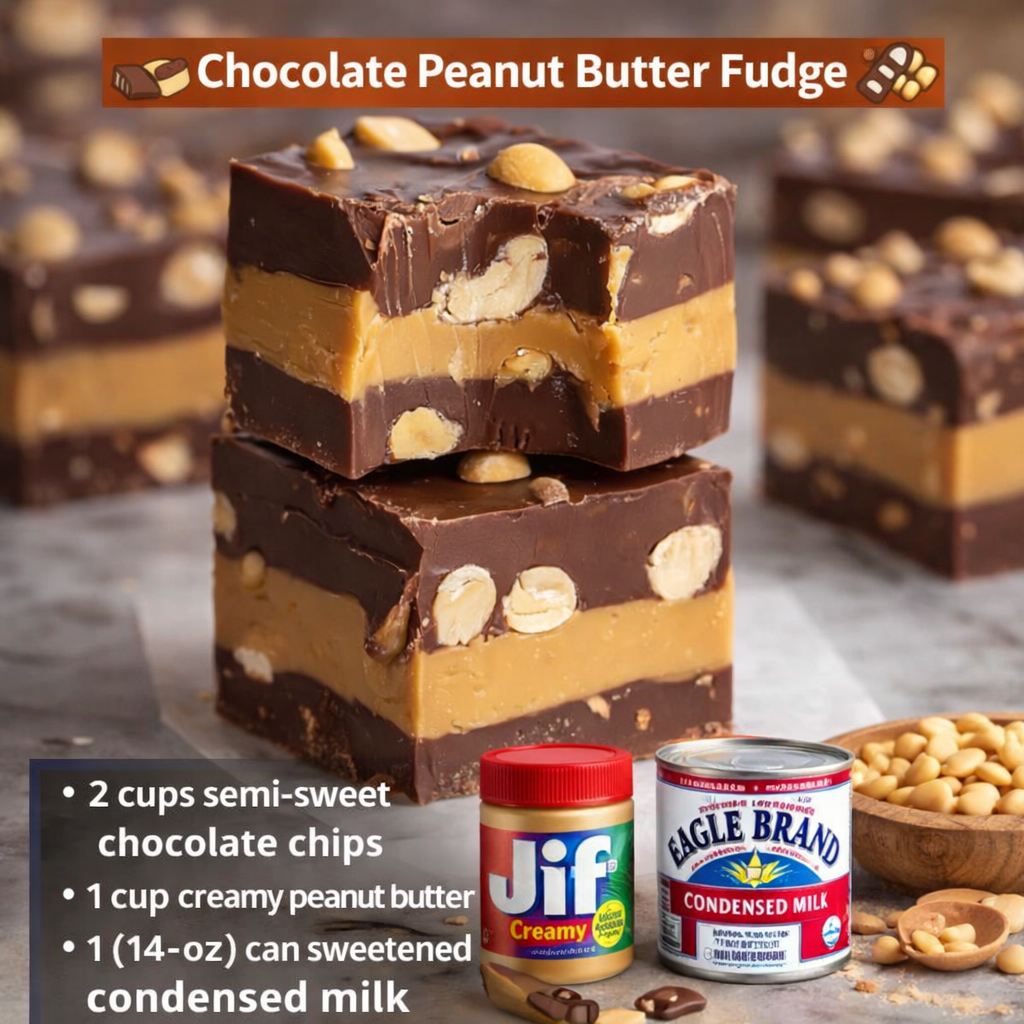
🍫🥜 Chocolate Peanut Butter Fudge 🥜🍫
Ingredients
Equipment
Method
- Prepare the Pan:
- Line an 8×8-inch square baking pan with parchment paper or foil, leaving an overhang on the sides for easy removal. Lightly grease it if using foil.
- Melt the Chocolate Layer:
- In a saucepan over low heat (or using a microwave-safe bowl in 30-second bursts), combine the chocolate chips and half of the sweetened condensed milk (about 2/3 cup). Stir until melted and smooth. Add a pinch of salt if desired.
- Layer the Chocolate Base:
- Pour half of the chocolate mixture into the prepared pan and spread evenly. Place the pan in the refrigerator or freezer for about 10 minutes to firm up slightly.
- Make the Peanut Butter Layer:
- In a clean saucepan or bowl, combine the peanut butter and the remaining sweetened condensed milk. Stir over low heat or microwave until smooth and creamy.
- Add the Peanut Butter Layer:
- Pour the peanut butter mixture over the chilled chocolate layer and spread evenly.
- Top with Remaining Chocolate:
- Reheat the remaining chocolate mixture if needed to loosen it up. Pour it over the peanut butter layer and spread evenly. Sprinkle roasted peanuts on top if using.
- Chill to Set:
- Refrigerate the fudge for at least 2 hours or until firm.
- Slice and Serve:
- Lift the fudge out of the pan using the parchment or foil overhang. Cut into squares and enjoy! Store in an airtight container in the refrigerator for up to one week.
Why Fudge and Caramel Turn Grainy
A boiled sugar syrup is a supersaturated solution: it holds more sugar than the water can normally dissolve. That state is unstable. One stray crystal is enough to start a chain reaction that turns the whole batch sandy, and it happens in seconds.
Three things trigger it. Stirring once the syrup is boiling. Undissolved sugar clinging to the side of the pan, which falls back in and seeds the mixture. And disturbing the syrup while it is still hot instead of letting it cool undisturbed first.
The fixes follow directly. Wash the pan walls down with a wet pastry brush early on. Stop stirring once it boils, and swirl the pan instead if you need to even out the heat. For fudge, cool it to about 43 °C (110 °F) before you beat it. Beating hot fudge is the single most common reason a batch turns grainy.
Some ingredients block crystals physically. Corn syrup, honey, butter, and cream all get in the way of the sugar lattice forming, which is why nearly every reliable caramel recipe includes at least one of them. They are not there for flavour alone.
Temperature decides the final texture, and the margins are narrow. Soft-ball, 112 to 116 °C, gives fudge and fondant. Firm-ball, 118 to 121 °C, gives chewy caramels. Hard-crack, 149 to 154 °C, gives brittle and toffee. A few degrees is the difference between a caramel you can cut and one you cannot chew.
Common Missteps
Line the pan with parchment and leave an overhang on two sides. This is not just for convenience; it protects the clean edges of the fudge when you lift it out. Foil works too, but it should be lightly greased because soft fudge can grip tiny wrinkles and tear when removed. For the neatest squares, chill the fudge until fully firm, lift it from the pan, then let it stand at room temperature for 3 to 5 minutes before slicing.
Melt each layer slowly. Semi-sweet chocolate chips hold their shape even when warm, so stir before deciding they need more heat. Overheating is the most common mistake with this recipe. If the chocolate turns thick, stir in 1 to 2 teaspoons of reserved sweetened condensed milk or a small teaspoon of butter to loosen it. Do not add water, as moisture can make chocolate seize.
Use creamy commercial peanut butter rather than natural peanut butter with oil separation. Natural peanut butter can make the center layer oily or crumbly because the fat ratio is less predictable. If the peanut butter layer looks too thick to spread, warm it gently and use an offset spatula or the back of a spoon. Store the finished chocolate peanut butter fudge in an airtight container in the refrigerator for up to one week, separating layers with parchment. For a smoother bite, cut small squares; the flavor is rich, and smaller pieces let the chocolate, peanut butter, and roasted peanut crunch stay balanced.
Flavour Variations
This no-bake chocolate peanut butter fudge can be adapted without changing the basic layering method. For a darker, less sweet version, use bittersweet chocolate chips in place of semi-sweet. The finished fudge will taste more cocoa-forward and slightly firmer after chilling. For a sweeter candy-shop style, use milk chocolate chips, but add the optional salt because milk chocolate can taste flat when paired with condensed milk.
For extra crunch, sprinkle chopped roasted peanuts between the peanut butter layer and the top chocolate layer, then add more on the surface. For a salty-sweet finish, use chopped pretzels on top just before chilling. They add a crisp bite, but they soften over time, so this version is best served within two days. A thin drizzle of melted peanut butter over the top also gives a polished look and reinforces the nutty aroma.
For a dairy-free style, use dairy-free chocolate chips and a dairy-free sweetened condensed milk alternative, checking that the peanut butter is also dairy-free. The set may be slightly softer, so chill longer before slicing. For a festive version, add holiday sprinkles, crushed candy pieces, or a light dusting of cocoa powder. You can also make thicker fudge in a loaf pan or thinner squares in a 9-inch pan, adjusting only the chill time and slice size.
Frequently Asked Questions
- Q: Why did my fudge turn grainy? Graininess usually comes from overheating the chocolate or stirring over heat for too long. Use low heat, stir often, and remove the mixture from the heat while a few chips are still visible.
- Q: Can I use natural peanut butter? It is not the best choice for this layered fudge because the oil can separate and make the peanut butter layer greasy. A smooth, no-stir creamy peanut butter gives the most stable texture.
- Q: How do I get clean slices? Chill the fudge until firm, use a sharp knife, and wipe the blade between cuts. Letting the slab sit for a few minutes before slicing helps prevent cracking.
- Q: Can I freeze chocolate peanut butter fudge? Yes. Wrap the sliced fudge tightly and freeze in an airtight container for up to two months. Thaw in the refrigerator to reduce condensation on the chocolate.
- Q: Why did my layers separate? The bottom chocolate layer may have chilled until too hard before the peanut butter layer was added. Chill it only until slightly firm and tacky so the next layer can bond.