The Best Peanut Butter Brownie Cups – Easy Recipe
Peanut Butter Brownie Cups with a creamy peanut butter center and chocolate topping—an easy, indulgent dessert everyone will love.
📋 Table of Contents
Why You’ll Love This Recipe
These Peanut Butter Chocolate Brownie Cups were created after several test batches aimed at getting the balance exactly right between rich chocolate flavor and a creamy peanut butter center. Many brownie cup recipes end up either too cakey or overwhelmingly sweet, but this version keeps the brownie layer dense and fudgy while allowing the peanut butter filling to stay soft and smooth without becoming oily. The contrast between the slightly chewy brownie edges and the creamy middle gives every bite a layered texture that feels like something from a specialty dessert counter.
One detail that makes a noticeable difference is whisking the eggs into the warm butter and sugar mixture until the batter becomes glossy. That shiny texture is a sign the sugar has started dissolving, which helps create the delicate crackly top brownies are known for. During testing, one batch turned dry because the flour was overmixed after adding the cocoa powder. Stirring only until the dry ingredients disappear keeps the brownie cups dense and moist rather than tough.
The smell while these bake is especially rich — deep cocoa, warm vanilla, and roasted peanut butter filling the kitchen within minutes. As the brownie cups cool, the chocolate aroma becomes even stronger, especially if semi-sweet chocolate is used for the topping. Chilling the layers before slicing is another step worth keeping. Skipping the chill time once resulted in messy layers that slid apart while cutting. Allowing the peanut butter filling to firm slightly creates clean, bakery-style layers with a smooth finish.
The peanut butter center also works because it contains powdered sugar rather than granulated sugar. Powdered sugar blends smoothly into the filling and gives it structure without a grainy texture. Using standard creamy peanut butter instead of natural peanut butter is important here. Natural peanut butter contains extra oil that can separate and make the filling too loose after chilling.
These brownie cups are especially satisfying served slightly chilled, when the chocolate topping has a gentle snap and the center stays creamy. For a softer dessert texture, letting them sit at room temperature for ten minutes before serving brings out the fudgy consistency in the brownie base. The combination of salty peanut butter, bittersweet chocolate, and soft brownie crumb creates a dessert that feels rich without becoming heavy after a few bites.
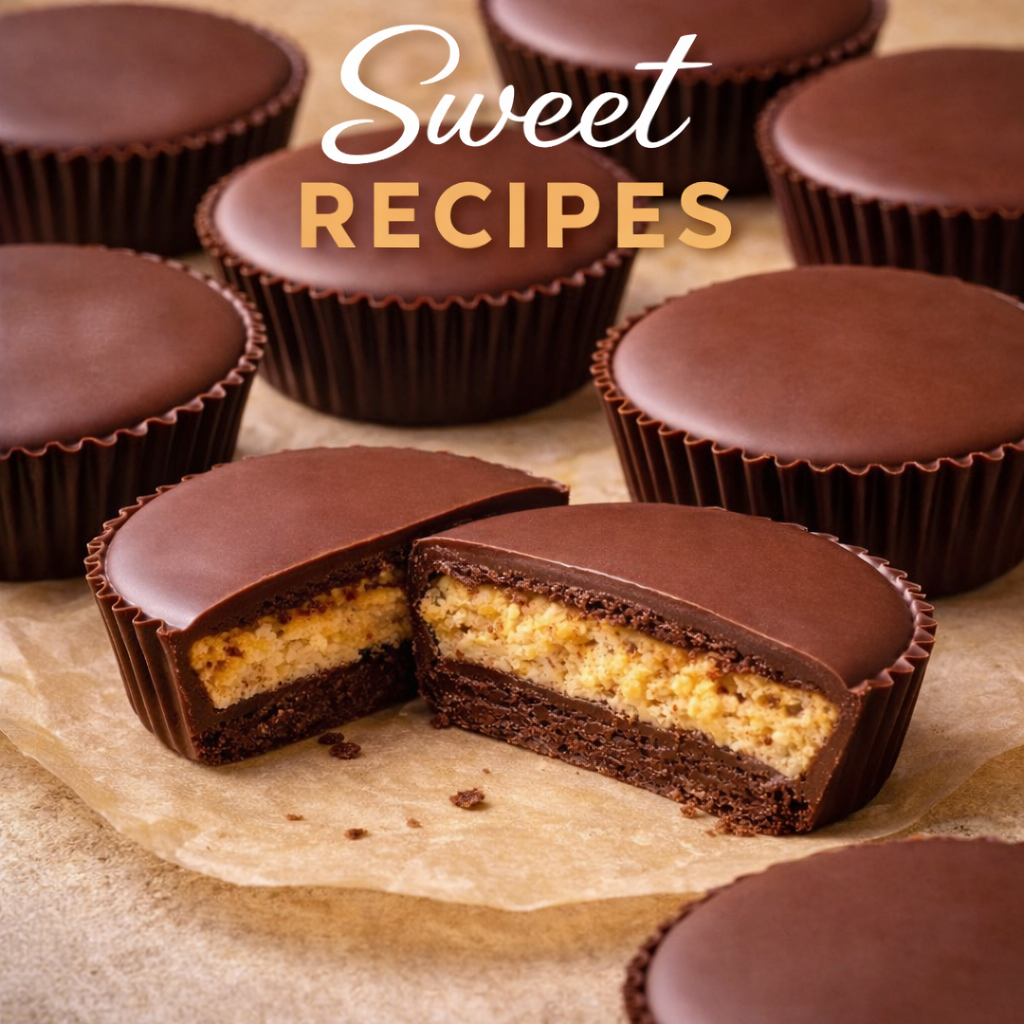
Peanut Butter Chocolate Brownie Cups
Ingredients
Equipment
Method
- Prepare the Brownie Base
- Preheat oven to 350°F (175°C).
- Grease or line a square pan (8×8 inch) or muffin tin.
- Melt butter and mix with sugar until smooth.
- Add eggs and vanilla; whisk until glossy.
- Stir in cocoa powder, flour, salt, and baking powder.
- Mix until just combined (don’t overmix).
- Bake the Brownies
- Pour batter into pan (or divide into muffin cups).
- Bake for 20–25 minutes until set but slightly fudgy.
- Let cool slightly.
- Make Peanut Butter Filling
- In a bowl, mix:
- Peanut butter
- Powdered sugar
- Vanilla
- Stir until smooth and thick.
- Assemble Layers
- Spread peanut butter mixture evenly over slightly cooled brownies.
- Chill for 10–15 minutes to firm up.
- Add Chocolate Topping
- Melt chocolate chips with cream (microwave in 20-second bursts).
- Stir until smooth.
- Pour over peanut butter layer and spread evenly.
- Chill & Serve
- Refrigerate for 30–60 minutes until set.
- Slice into squares or remove from muffin tin.
Notes
Slightly underbake brownies for a fudgier texture.
Chill before cutting for clean layers.
Expert Tips & Techniques
For the richest brownie texture, avoid baking until the center looks completely dry. Brownies continue cooking from residual heat after leaving the oven, and slightly underbaking them keeps the interior soft and fudgy instead of crumbly. A toothpick inserted near the center should come out with a few moist crumbs rather than wet batter.
One common mistake with layered brownie desserts is adding the peanut butter layer while the brownies are still hot. The filling softens too much and loses its structure, causing uneven layers later. Let the brownie base cool until just slightly warm before spreading the filling evenly across the surface.
When melting the chocolate topping, microwave in short bursts and stir between each interval. Chocolate overheats faster than many people expect, especially when mixed with cream. If the topping becomes thick or grainy, stirring in one teaspoon of warm cream usually smooths it out again.
Muffin tins create thicker brownie cups with defined edges, while an 8×8 pan gives cleaner dessert bars. Both methods work well, but lining the pan with parchment paper makes removal much easier after chilling. Refrigerating the finished brownies for at least thirty minutes also improves slicing and prevents the chocolate topping from cracking unevenly.
For storage, keep the brownie cups in an airtight container in the refrigerator for up to five days. The peanut butter layer stays firmer when chilled, while the brownie base remains dense and moist. Bringing them to room temperature for a few minutes before serving softens the chocolate and enhances the cocoa aroma.
Variations & Alternatives
These brownie cups can be customized in several ways depending on the flavor profile you prefer. Dark chocolate chips create a deeper cocoa flavor and balance the sweetness of the peanut butter filling more effectively than milk chocolate. For extra crunch, chopped roasted peanuts or crushed pretzels can be sprinkled over the chocolate topping before chilling.
Almond butter or cookie butter also work well in place of peanut butter, though the texture may become slightly softer depending on the brand used. If making a gluten-free version, replace the all-purpose flour with a reliable 1:1 gluten-free baking blend. The brownies remain fudgy because the recipe already uses a relatively small amount of flour.
Espresso powder is another excellent addition. Just half a teaspoon mixed into the brownie batter deepens the chocolate flavor without making the dessert taste like coffee. Some bakers also swirl caramel sauce into the peanut butter layer for a sweeter finish and a more dramatic layered appearance.
Frequently Asked Questions
- Q: Why are my brownies dry instead of fudgy? Dry brownies usually result from overbaking or measuring too much flour. Remove the brownies once the center is set but still slightly soft for the best texture.
- Q: Can I freeze these brownie cups? Yes. Wrap them individually or store in layers separated by parchment paper. Thaw in the refrigerator overnight for the best texture and flavor.
- Q: What type of peanut butter works best? Standard creamy peanut butter works best because it holds its structure after chilling. Natural peanut butter tends to separate and can make the filling oily.
- Q: Can I make these in advance for parties? Absolutely. In fact, the layers become cleaner and more stable after several hours in the refrigerator, making them ideal for preparing a day ahead.
- Q: Why did my chocolate topping crack while slicing? This usually happens when the topping is too cold. Let the brownies sit at room temperature for a few minutes before cutting with a sharp knife.