Creamy Vanilla Swirl Caramels You’ll Love (Easy 4-Ingredient Recipe)
Creamy Vanilla Swirl Caramels are soft, buttery, and tender. Made with just 4 simple ingredients for an easy homemade candy.
📋 Table of Contents
Why You’ll Love This Recipe
Creamy Vanilla Swirl Caramels are the kind of homemade candy that tells you, by smell alone, when you are close to something special. As the sugar, butter, and cream warm together, the kitchen takes on that deep dairy-caramel aroma: toasted, buttery, and slightly nutty, with vanilla waiting to soften the edges at the end. The finished texture should be smooth and tender, not sticky enough to pull at your teeth and not firm enough to crack. When cooked properly, each square bends slightly before melting into a rich, creamy bite.
What makes this recipe worth saving is its balance. There are only a few essential ingredients, so technique matters more than a long shopping list. Heavy cream keeps the caramel soft, butter gives it a rounded, satin finish, and pure vanilla extract brings warmth without making the candy taste flatly sweet. I like adding the vanilla off the heat because it preserves its fragrance; if it boils too long, the aroma fades and the caramel tastes more sugary than creamy.
One common mistake is rushing the boil or stirring too aggressively once the mixture is bubbling. I have seen caramel turn grainy when sugar crystals cling to the side of the pan and fall back in. The fix is simple: use a heavy-bottom saucepan, stir gently, and keep the heat steady rather than high. If the mixture looks slightly separated, lower the heat and stir slowly until it comes back together. A candy thermometer is not optional here; stopping around 245°F gives a soft, sliceable caramel, while going much higher creates a chewier, firmer candy.
The vanilla swirl gives these caramels a polished bakery look without making the method fussy. A thin drizzle of warmed cream or melted white chocolate across the surface creates pale ribbons that set into the glossy amber base. For cleaner pieces, let the slab cool fully before cutting, then use a lightly buttered knife. The result is a homemade caramel with a creamy bite, a warm vanilla finish, and just enough elegance for gift boxes, dessert trays, or a quiet square with coffee.
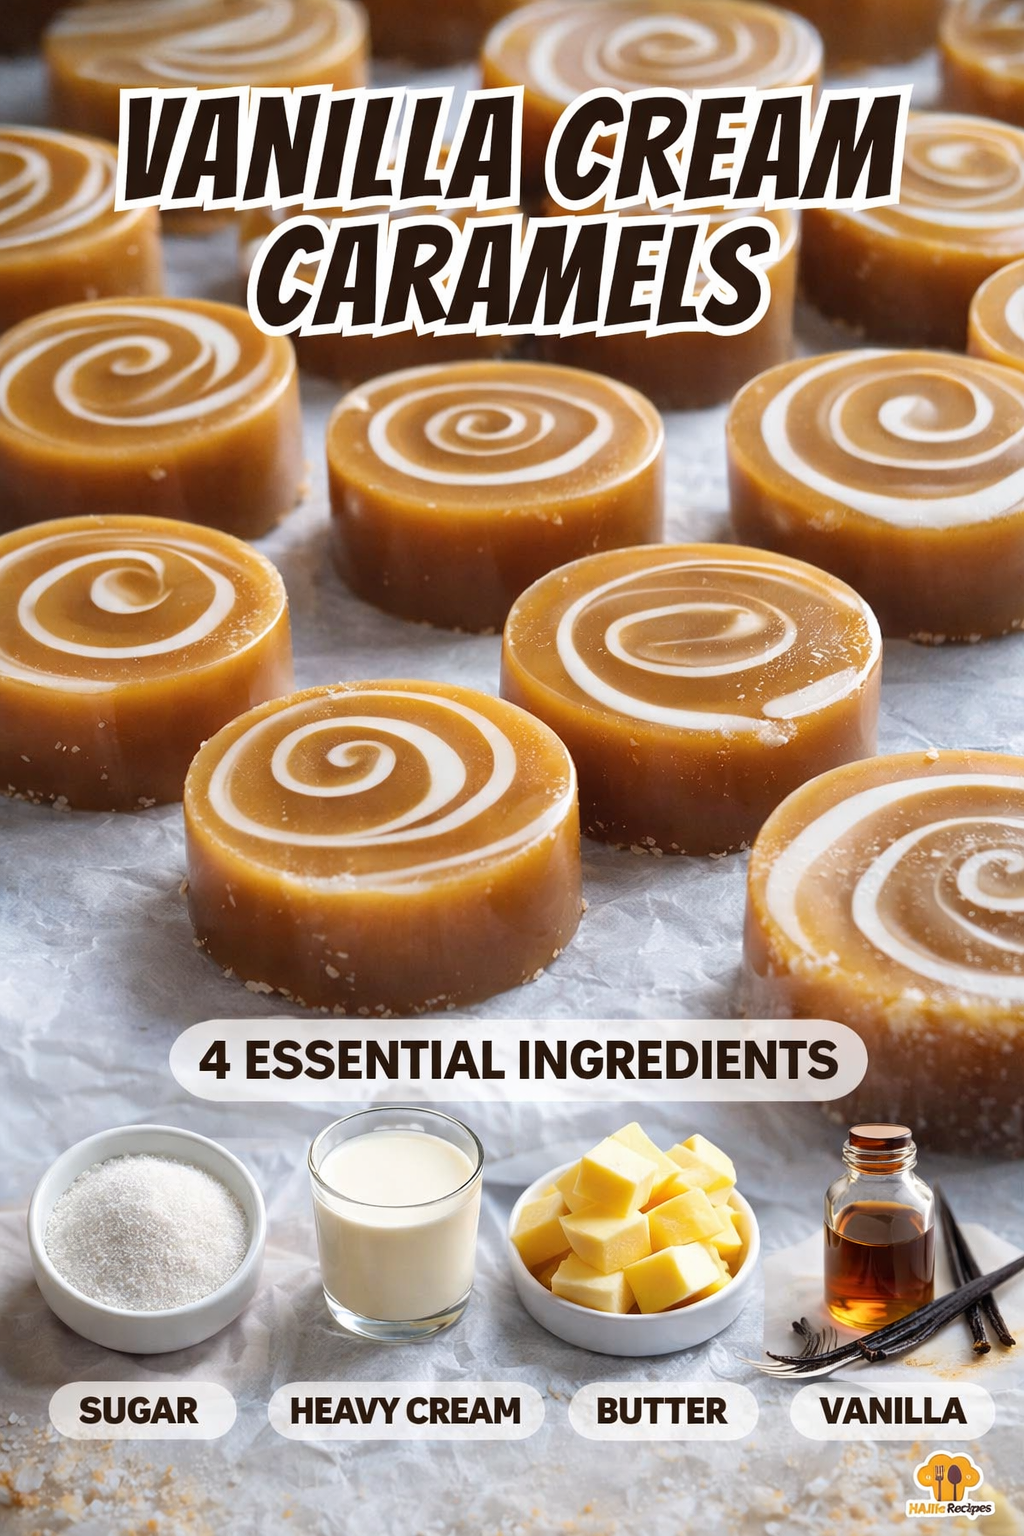
Creamy Vanilla Swirl Caramels
Ingredients
Equipment
Method
- Prepare Your Pan:
- Line an 8×8-inch baking dish with parchment paper or use silicone molds. Lightly grease with butter or nonstick spray.
- Heat the Sugar Mixture:
- In a heavy-bottomed saucepan over medium heat, combine sugar, butter, and heavy cream.
- Stir constantly with a heatproof spatula or wooden spoon until the mixture comes to a gentle boil.
- Cook the Caramel:
- Continue cooking, stirring frequently, until the mixture reaches 245°F (118°C) on a candy thermometer (firm ball stage). This takes about 10–15 minutes.
- Add Vanilla:
- Remove the pan from heat and immediately stir in the vanilla extract (and a pinch of salt, if using).
- Mix until fully combined and smooth.
- Pour and Swirl:
- Carefully pour the caramel into your prepared pan or molds.
- If adding a swirl effect, drizzle warmed cream or melted white chocolate over the surface, then use a toothpick to create spiral designs before the caramel sets.
- Cool and Cut:
- Let the caramels cool completely at room temperature (2–3 hours or overnight).
- Once set, cut into squares or unmold and wrap individually in wax paper.
Notes
Sugar Crystals, and How to Keep Them Small
A boiled sugar syrup is a supersaturated solution: it holds more sugar than the water can normally dissolve. That state is unstable. One stray crystal is enough to start a chain reaction that turns the whole batch sandy, and it happens in seconds.
Three things trigger it. Stirring once the syrup is boiling. Undissolved sugar clinging to the side of the pan, which falls back in and seeds the mixture. And disturbing the syrup while it is still hot instead of letting it cool undisturbed first.
The fixes follow directly. Wash the pan walls down with a wet pastry brush early on. Stop stirring once it boils, and swirl the pan instead if you need to even out the heat. For fudge, cool it to about 43 °C (110 °F) before you beat it. Beating hot fudge is the single most common reason a batch turns grainy.
Some ingredients block crystals physically. Corn syrup, honey, butter, and cream all get in the way of the sugar lattice forming, which is why nearly every reliable caramel recipe includes at least one of them. They are not there for flavour alone.
Temperature decides the final texture, and the margins are narrow. Soft-ball, 112 to 116 °C, gives fudge and fondant. Firm-ball, 118 to 121 °C, gives chewy caramels. Hard-crack, 149 to 154 °C, gives brittle and toffee. A few degrees is the difference between a caramel you can cut and one you cannot chew.
Common Missteps
The best homemade vanilla caramels come from temperature control, not guesswork. Use a heavy-bottom saucepan because thin pans create hot spots that scorch the dairy before the sugar reaches the right stage. Medium heat is enough; the mixture should bubble steadily, not violently. A calm boil gives the water time to evaporate evenly, which is why the caramel sets creamy instead of greasy or brittle.
Clip the candy thermometer so the tip sits in the caramel but does not touch the bottom of the pan. The pan base is hotter than the candy itself, and a false reading can make you stop too early. If the caramel is undercooked, it may set like a thick sauce instead of a candy. You can return it to the saucepan, warm it gently, and cook it back to 245°F. If it goes too far and becomes firm, cut smaller pieces and wrap them as chewy caramels rather than trying to soften the whole batch.
Add vanilla after removing the pan from heat. The caramel will hiss and release a sweet, floral steam; stir slowly until glossy. For storage, wrap each piece in wax paper and keep the caramels in an airtight container at cool room temperature for about one week, or refrigerate for a firmer texture. Let chilled caramels sit out for 10 minutes before serving so the butter and cream soften back into that smooth, tender bite.
Other Directions
For salted vanilla caramels, stir a small pinch of fine sea salt into the hot caramel and finish the surface with a few flakes of salt before it sets. The salt cuts through the sweetness and makes the butter taste fuller. For a stronger bakery-style flavor, use vanilla bean paste instead of extract; the tiny specks look beautiful against the amber caramel and give a deeper aroma.
The swirl can be changed to suit the occasion. Melted white chocolate creates a firmer, decorative ribbon, while warmed cream gives a softer, more subtle marbled look. A little espresso powder stirred into the cream makes a mocha-vanilla caramel with a lightly bitter finish. For a nutty version, sprinkle toasted pecans or almonds into the lined pan before pouring in the caramel; the contrast between tender candy and crisp nuts is especially good.
These caramels are naturally gluten-free when made with gluten-free ingredients, but always check labels on vanilla and white chocolate if serving guests with allergies. A dairy-free version is possible with plant-based butter and full-fat coconut cream, though the texture will be softer and the flavor will carry a coconut note.
Frequently Asked Questions
- Q: Why did my caramels turn grainy? Graininess usually comes from sugar crystals forming on the sides of the pan or from stirring too roughly as the mixture boils. Cook over steady medium heat, stir gently, and avoid scraping dried sugar crystals back into the caramel.
- Q: Can I make these without a candy thermometer? A thermometer gives the most reliable result. The firm-ball stage is precise, and a few degrees can change the texture from soft and creamy to sticky or overly chewy.
- Q: Why are my caramels too soft to cut? They were likely cooked below 245°F or cut before fully cooling. Return the mixture to the pan if needed, reheat gently, cook to the correct temperature, and let it cool completely before slicing.
- Q: How do I get clean caramel squares? Chill the slab briefly, butter a sharp knife, and wipe the blade between cuts. Do not press with a sawing motion; one firm downward cut gives neater edges.
- Q: Can I double the recipe? Yes, but use a larger heavy-bottom pot because boiling caramel rises quickly. A deeper batch also takes longer to reach temperature, so rely on the thermometer rather than the clock.